Getting Started with ALwrity AI Writer🚀🤞
- DikshaAI
- Jan 7, 2025
- 5 min read

Updated: May 21, 2025
To kickstart your blogging journey with the GitHub ALwrity AI Content platform, stay calm and follow the simple steps outlined below:

There are multiple ways of getting started with ALwrity AI writer. For specific content needs, try out our AI Tools.
If you want a Full-fledged writing assistant, catering to all content writing cases, Follow the guide below. Using this method, we will get access to complete AI writing software, for which you will only need to provide your keys and no more AI prompting.
No more monthly subscriptions. Read our open-source Wiki for all the features of ALwrity.
We have strong community support and will help you get started. Reach out to us if the below guide seems complex to you.
Option 1: FOLLOW-ME Local Laptop Install (WINDOWS)
Step 0: Pre-requisites: Git, Python 3
Installing Python on Windows:🐍🪟
Launch PowerShell as an administrator: Press Windows Key + X, then select "Windows PowerShell (Admin)".
Type python. If Python isn't installed, Windows will prompt you to 'Get Python'.
If Python is installed, you should see '>>>>>'.
If not, download python on your laptop/PC (Go to this link-https://www.python.org/downloads/ to download Python) and click download the latest Python version. An example is shown in the below photo.

Next⬇️
After downloading, open the downloaded Python file, click "Use admin privileges when installing py.exe," and click "Install now". See the example below.

Next⬇️
Now Python is installed, click the close button. The example is shown in the above photo.
Installing Git on Windows:🛺
Open PowerShell or Windows Terminal: Press Windows Key + X, then select "Windows Terminal".
Paste or type and press enter: <br> winget install --id Git.Git -e --source winget
Wait for the download bars to finish.
Or download Git on your laptop/PC (Go to this link - https://git-scm.com/download/win). Download 64-bit Git for Windows Setup. See the example below.

Next⬇️
After downloading, open the Git file and start installing. Follow the step-by-step shown in the visual example below.

Now Git is installed. Click the check box "Launch Git Bash" and click "Finish". Now you are ready for step 1.
Next⬇️
Step 1: Clone the ALwrity AI Writer repository to your local machine.
Open Windows PowerShell as Administrator: Find and open "Windows PowerShell (Admin)" from the start menu.
Clone the Repository: Run the following command in PowerShell to clone the repository:
git clone https://github.com/AJaySi/AI-Writer.git(copy and paste) This command will download all the files from the repository to your local machine. See the visual example below.

Verify the Clone: After completing the cloning process, navigate into the newly created directory using:
cd AI-WriterCongratulations! Once you've cloned the repository, proceed with the next steps for installation and setup.
Next⬇️
Step 2: Install required dependencies:
Run the following command in PowerShell:
python -m pip install -r requirements.txt See the visual example below.

Next⬇️
Step 3: Run the script:
After installing the required file txt run the following command in PowerShell:
streamlit run alwrity.pyNext⬇️
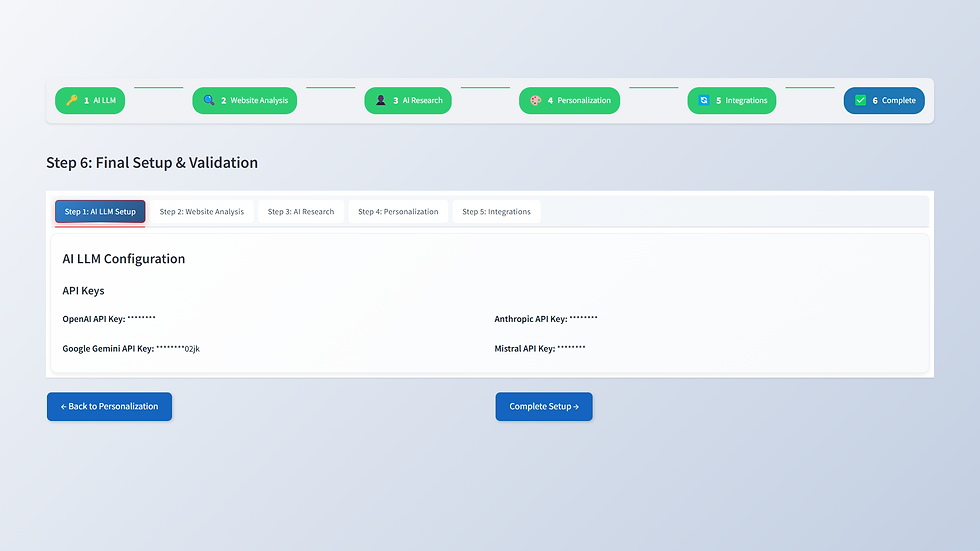
Step 4: The tool will guide you through setting up your APIs.
The ALwrity tool will then guide you on where to get Free APIs and how to use them. Below the UI example, you will see the API keys insert option. Once you input the API keys, save them by clicking "save keys."
First, you will start by adding the AI LLM API (OpenAI or Google Gemini). For example, I used the Google Gemini API.

Click continue after saving the keys successfully. Next, you can provide your current website URL for Analysis (Optional). And click continue.

Now, do the AI web research API setup. Provide the following API:
Serper API for Google research.
Tavily API for AI web research.
Firecrawl API to crawl website data.
Metaphor/EXA API for neural research.
After providing all these API keys, select continue for the next steps.

Now you can do the personalization setup in 2 steps:
1. ALwrity Setup: Provide your exciting website URL. ALwrity will set up the tool according to your brand voice, style, and tone.

2. Manual Setup
Follow these steps to do a manual setup:
1. Set up blog content characteristics:
Blog length (I select 2000 words).
Blog type (I select professional).
Target demographic (I select the professional).
Content type (I select information).
Content language (I select English).
Output format (I select markdown).

2. Blog Image generation setting:
Select the image generation model (I select stable-diffusion).
Set the number of images (I select 1).
Select image style (I select Realistic).

3. AI generation setting:
Choose an AI provider (I select Google).
Choose AI model (I select Gemini-1.5-flash-latest).
Choose the creativity level from 0.00 to 1.00 (I select 0.70).
Set the maximum length (I set it to 4000 words).

4. Search settings for personalized web research:
Set geographic location (I set it to "us" for the United States).
Set search language (I select "en" for English).
Set a number of results you want to research from any SERP page (I select 10).
Set time range (I select anytime for now). You can set it to the past year, the past month, or the past week according to your choice.
Now save the manual setting and move to the next step.

After saving, the setting tool will guide you to ALwrity integration. Here, you will connect your content platform (like website, social media, & analytics tool) and the tools. (Coming soon in the next update)
Select continue for now to the next step.

Now the tool will navigate you to the final setup and validation. You can check and review the settings and click the complete setup button to launch the tool.
For more details on personalization, read this blog.
Next⬇️
After completing the setup tool will navigate to the content planning option. You can change the option from the dashboard.

Now you're all set to embark on your blogging journey with ALwrity Free & Open-Source AI Writer! If you have any issues regarding ALwrity installation or need help, please let us know in the comment section below.


After reading the article on getting started with Alwrity AI Writer, I found the explanation of how the tool guides users through prompt-based content creation quite clear and practical. It was interesting how the setup focuses on choosing writing goals and then letting the AI generate structured drafts that can be edited further. I also liked the way it emphasizes experimenting with different tones before finalizing content, which feels useful for beginners. While exploring related tools I even thought about how students sometimes rely on Online Assignment Help when balancing tight deadlines and services like New Assignment Help often come up in that context without distracting from the learning process I’m curious how Alwrity will evolve in terms of accuracy…
the app doesnt ask us the open ai api, it just asks us the gemini api.